In this article, you will learn how to repair your Japanese garden tools at home, saving you time and money. Whether you have a favorite pair of pruning shears or a trusty garden knife, over time these tools can become worn and lose their sharpness. But don’t worry, with a few simple steps, you can bring them back to life and have them working like new again.
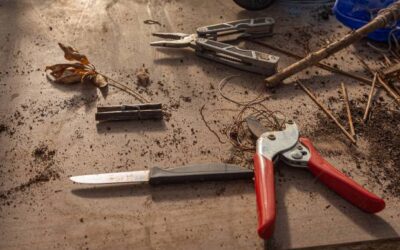
First, let’s talk about pruning shears. Over time, the blades can become dull and lose their cutting power. To sharpen them, start by cleaning the blades with a mixture of water and dish soap. Then, use a sharpening stone or a file to sharpen the blades. Make sure to follow the angle of the blade and stroke it in one direction only. Finally, lubricate the blades with a thin layer of oil to prevent rusting and keep them working smoothly.
Now, let’s move on to garden knives. Often used for weeding and harvesting, these knives can get blunt through repeated use. To sharpen your garden knife, start by cleaning the blade with a mixture of water and dish soap. Next, hold the knife at a 20-degree angle and run a sharpening stone along the edge of the blade, moving from base to tip. Be sure to keep a consistent angle and apply even pressure. Finally, wipe off any residue and apply a thin coat of oil to prevent rusting.
With these simple steps, you can repair and sharpen your Japanese garden tools at home, ensuring they stay in top shape for many gardening seasons to come. So don’t let wear and tear discourage you – get those tools back in action and continue enjoying your time in the garden!
Introduction to Japanese garden tools
Japanese garden tools are known for their exceptional craftsmanship and durability. These tools are specifically designed to help maintain the Zen-like beauty and tranquility of traditional Japanese gardens. However, like any other tools, Japanese garden tools can also experience wear and tear over time. Therefore, it is important to understand how to identify common issues, repair them, and maintain these tools properly.
Types of Japanese garden tools
There are various types of Japanese garden tools, each serving a specific purpose. Some common tools include pruning shears, secateurs, bonsai tools, kama (sickle), machete, and many more. Each tool has its own unique design, making it suitable for specific gardening tasks. It is important to have a basic knowledge of these tools and their uses to ensure proper maintenance.
Importance of maintaining Japanese garden tools
Proper maintenance of Japanese garden tools is crucial to ensure their longevity and effectiveness. By taking care of these tools, you can not only extend their lifespan but also enhance your gardening experience. Regular maintenance helps prevent wear and tear, maintains sharpness, and ensures the accuracy of the tools. Additionally, a well-maintained tool is safer to use, reducing the risk of accidents or injuries.
Identifying Common Wear and Tear Issues
Japanese garden tools, like any other tools, can face common wear and tear issues over time. It is important to identify these issues early on to prevent further damage and maintain the quality of these tools.
Some common problems faced by Japanese garden tools include:
- Rusting: Due to exposure to moisture and harsh outdoor elements, tools can develop rust, compromising their functionality.
- Blunt blades: Over time, the blades of the tools can become dull, making it difficult to cut through branches or foliage effectively.
- Handle damage: Wooden handles can develop cracks, splinters, or become loose, affecting the overall usability of the tool.
- Loose or missing parts: Screws, nuts, and small components can become loose or even fall off, leading to instability and reduced performance.
By being observant, you can easily identify signs of wear and tear. Look out for rust spots, dull blades, cracks in handles, or any loose parts that might compromise the functionality of the tool.
Essential Tools and Materials for Repair
Before you begin repairing your Japanese garden tools, it is important to gather the necessary tools and materials. Having a basic toolkit specifically meant for repairing these tools will make the process easier and more efficient.
A basic toolkit for repairing Japanese garden tools should include:
- Screwdriver set: Different sizes and types of screwdrivers will help you tighten loose screws or replace damaged ones.
- Pliers: Pliers will assist in gripping and bending small parts, as well as helping with handle repairs.
- Sharpening stones: Different types of sharpening stones will help restore the sharpness of blades.
- Epoxy resin: This adhesive is useful for handle repairs or for securing loose components.
- Sandpaper: Sandpaper comes in handy for smoothing out wooden handles and removing rust spots.
In addition to the basic toolkit, you may require specialized materials depending on the repair needs of your tools. Some examples include replacement handles, springs, or specific types of paints or finishes for restoring damaged surfaces.
Cleaning and Rust Removal Techniques
Cleaning and rust removal are essential steps in maintaining Japanese garden tools. Regular cleaning helps prevent the build-up of dirt and debris, while rust removal ensures that the tools remain functional and aesthetically pleasing.
To clean Japanese garden tools, follow these steps:
- Remove any dirt or debris from the tool using a brush or cloth.
- Fill a bucket or basin with warm soapy water.
- Submerge the tool in the soapy water and scrub it gently with a brush or cloth.
- Rinse the tool thoroughly with clean water and dry it completely using a towel or cloth.
- For tools with wooden handles, avoid soaking the entire tool in water to prevent damage to the handle.
In the case of rust removal, one effective method is using vinegar and baking soda:
- Create a paste by mixing baking soda and water until it forms a thick consistency.
- Apply the paste to the rusty areas of the tool and let it sit for a few hours.
- After waiting, scrub the rusted areas with a brush or scouring pad.
- Rinse the tool with clean water and dry it thoroughly.
To prevent future rusting, it is recommended to store Japanese garden tools in a dry place, away from moisture. Applying a thin layer of oil or lubricant on the metal parts can also act as a protective barrier against rust.
Sharpening and Blade Care
Proper blade care and maintenance are essential for maintaining the efficiency and effectiveness of Japanese garden tools. Over time, the blades can become dull, affecting their cutting ability. It is important to sharpen the blades regularly to ensure smooth and precise cuts.
Different types of blades require different sharpening methods. Here are some general tips to keep in mind:
- Pruning shears and secateurs: These tools usually have a curved blade. To sharpen them, use a sharpening stone or a file. Hold the tool securely and gently sharpen the blade in a curved motion, following the natural curve of the blade. Be sure to maintain the original bevel angle while sharpening.
- Bonsai tools: Bonsai tools have delicate blades and require extra care while sharpening. Using a fine-grit sharpening stone, gently sharpen the blade, following the original bevel angle.
- Kama (sickle) and machete: These tools have larger, straight blades. Sharpening them requires a slightly different approach. Use a coarse-grit sharpening stone and move the blade along the stone in a back-and-forth motion to achieve a sharp edge.
Choosing the right sharpening tools is also important. Invest in quality sharpening stones or files that are appropriate for the type of blade you are sharpening. Remember to maintain a consistent angle and use gentle, controlled strokes while sharpening.
In addition to sharpening, proper blade care and maintenance include regular oiling of the blades to prevent rust, wiping off any debris after each use, and storing them in a clean and dry place.
Handle Repair and Replacement
Handles are an integral part of Japanese garden tools and can suffer from damage over time. Cracks, splits, or loose handles can affect the usability and safety of the tools. It is important to identify handle damage early on and address it promptly.
To repair cracks or splits in wooden handles, follow these steps:
- Clean the handle thoroughly, removing any dirt or debris.
- Apply wood glue or epoxy resin to the cracked/split area.
- Clamp the handle tightly together using a clamp or sturdy rubber bands.
- Allow the glue or resin to dry completely before removing the clamps.
In some cases, the damage to the handle may be beyond repair. In such situations, it is necessary to replace the damaged handle. Replacement handles can be purchased online or at local garden supply stores. Follow the manufacturer’s instructions to ensure a proper fit and secure attachment.
Fixing and Replacing Small Parts
Loose screws, nuts, or other small parts can affect the stability and performance of Japanese garden tools. Identifying and addressing these issues will help maintain the reliability of the tools.
For loose screws or nuts, tighten them using the appropriate screwdriver or pliers. In the case of missing or damaged screws or nuts, replace them with suitable alternatives. Hardware stores or online suppliers typically carry a variety of small parts suitable for Japanese garden tools.
Some tools also have small parts like springs, which can wear out over time. If the spring is no longer functioning properly, it is advisable to replace it with a new one. Springs that are specific to each tool can usually be found at specialized stores or through online vendors.
Properly securing loose or wobbly components, such as blades or handles, is crucial for the functionality and safety of the tools. If you notice any instability, take the time to identify the cause and secure the components appropriately.
Restoring Damaged Finishes
Japanese garden tools are often adorned with various types of finishes, such as painted surfaces or protective coatings. These finishes can be damaged over time due to exposure to the elements or regular use. Restoring these finishes will not only enhance the appearance of the tools but also protect them from further damage.
To repair chipped or worn-out paint, follow these steps:
- Clean the area around the damaged finish, removing any dirt or debris.
- Use fine-grit sandpaper to gently sand the damaged area, creating a smooth surface.
- Apply a primer suitable for the type of finish you will be applying.
- Once the primer is dry, carefully apply a layer of paint in the desired color.
- Allow the paint to dry completely before applying a clear topcoat for added protection.
For tools with protective coatings, such as oil or lacquer, it is recommended to consult a specialist or follow the manufacturer’s instructions for repair or restoration.
Specific Techniques for Different Tools
Different Japanese garden tools require specific repair techniques due to their unique designs and functions. Here are some techniques for repairing specific tools:
Pruning shears and secateurs:
- Clean the blades thoroughly after each use to prevent sap or resin build-up.
- Sharpen the blades regularly to maintain their cutting efficiency.
- Replace worn-out springs or screws for smooth operation.
Bonsai tools:
- Clean the blades carefully to avoid damaging delicate foliage.
- Regularly oil the blades to prevent rusting.
- Sharpen the blades using a fine-grit sharpening stone or file.
Kama (sickle) and machete:
- Inspect the blade for any chips or dents and file them down if necessary.
- Clean and oil the blade after each use to prevent rusting.
- Sharpen the blade using a coarse-grit sharpening stone or file.
Conclusion
Regular maintenance and repair of Japanese garden tools are essential to ensure their longevity and optimal performance. By understanding common wear and tear issues, identifying them early, and addressing them promptly, you can enjoy the beauty and functionality of these tools for years to come.
Appreciate the art of craftsmanship that goes into creating these tools, and take the time to clean, sharpen, and repair them regularly. With proper care, these tools will continue to serve you well in maintaining the serene beauty of your Japanese garden. So, roll up your sleeves, gather your tools, and embark on the journey of repairing and maintaining your cherished Japanese garden tools at home.